|
Systems Status
Announce?  RSS RSS
Blog? RSS RSS
Help Topics
Deschutes Facilities
Campus Facilities
User Account Info
Roundcube Mail
Contact Systems
Misc
|
Printing from Windows
- We only support printing via the LPD protocol.
- Download the printer driver. They are available from the Model link in the printer table below.
- Some drivers are executable, and will run install the driver directly, others are archives that can be extracted and used in the following instructions.
- Note: Use the PS driver, not the XPS driver.
Configure Windows 10 to print using LPD protocol
- In "Settings" go to "Devices"
- Select "Printers & Scanners"
- Click "Add a printer or scanner"
- Click "The printer that I want isn't listed"
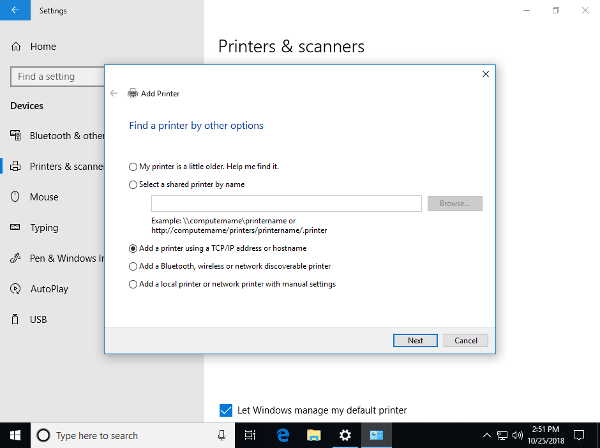
- In "Find a printer by other options" select "Add a printer using TCP/IP address or hostname"
- In "Add Printer"
- Device type "TCP/IP Device"
- Hostname "lp.cs.uoregon.edu"
- Uncheck "Query the printer and automatically select the driver to use"
- Click "Next" to go to "Detecting TCP/IP"
- The system will fail to detect the TCP/IP port
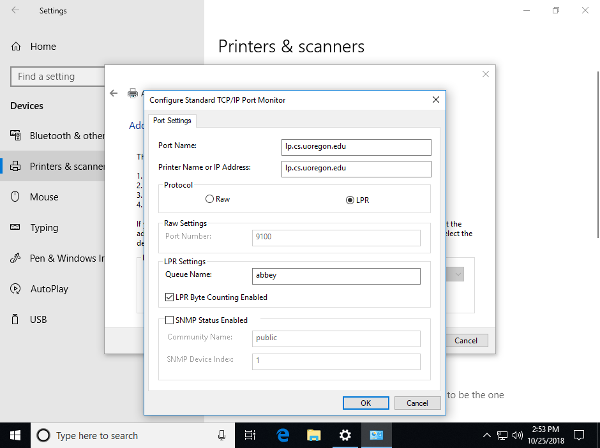
- In "Additional port information required", select "Custom", click "Settings..."
- Select the "LPR" protocol
- Set "Queue Name" to the printer you want to use
- Check "LPR Byte Counting Enabled"
- click "OK"
- Click "Next"
- Select the driver for the printer.
- Click "Next"
- Choose an appropriate "Printer name"
- Click "Next"
- Do not share the printer
- Select the Printer and choose "Manage"
- Select "Printer Properties", then "Device Settings"
- Change "Duplex Unit" to "Installed"
- Select "Ports"
- Uncheck "Enable bidirectional support"
Configure Windows 7 to Print using LPD protocol
- In the Control Panel > Programs and Features
- Turn Windows features on or off, expand Print and Document Services and
- select the LPR Monitor Port check box and then click OK
- Go to Devices and Printers and click Add a Printer and then (oddly) choose Add a local printer.
- Select Create a new port and the Type of port is LPR Port
- Then type in the information about the printer
- Name of Server: lp.cs.uoregon.edu
- Name of printer or queue: goldman (or whichever printer you are trying to add)
- Then you get to the printer driver installation. Choose Have Disků, Copy manufacturer's files from, Select the location where you stored the downloaded driver, click OK.
- The -x32 or -x64 specifies the 32bit or 64bit version of the driver.
- A couple of Nexts and then Printer Name Goldman. Next.
- It then says Installing printer. It may show copying files, but I had inconsistent results of what happened next. Once I had to click cancel and the printer worked anyway, but usually after a few minutes you get to the Success page where there is a button to Print Text Page.
Configure Windows XP for LPD protocol
References
See Also
|

